# Tutorials
# Create a dictionary
In this tutorial we are going to explain by means of an example how to create a dictionary in Knolar.
Before creating the dictionary it is important to know all the variables on which the ingestion and enrichment will be performed later. In addition, we must have prior knowledge about the type of field to be ingested in each of the variables.
The creation of a dictionary is mandatory before performing an ingestion in real time or batch. Once the dictionary is created, we can proceed to perform the ingestions.
# Steps to create a dictionary
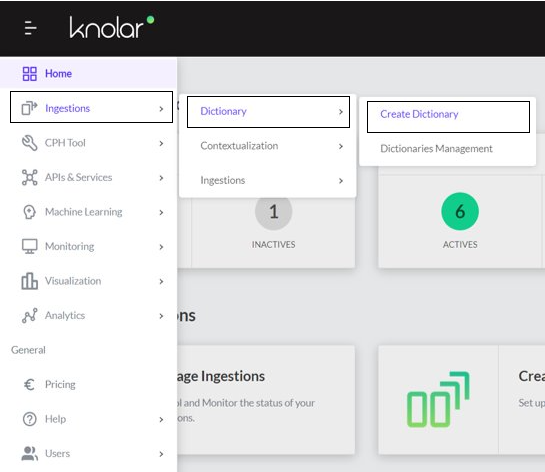
- In the menu, select ingestions -> dictionary -> create dictionary.
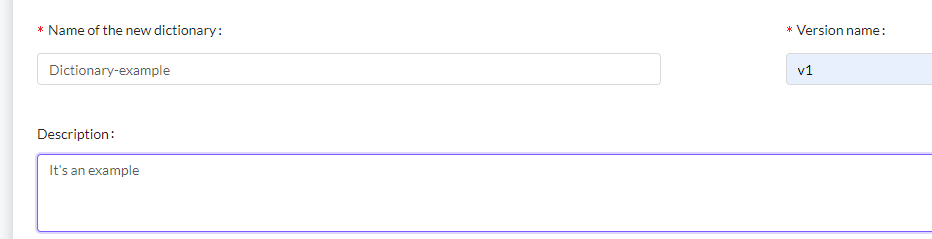
- You must enter the name of the new dictionary, the name of the version and a description of the dictionary (these fields are obligatory).
The last step is to add the fields. To do this, it is necessary to complete:
- The field name: It will be the name of the column generated in the ingestion.
- property: In this option we must indicate the type of data that we are going to save in each one of the variables. We can find different options:

The fields that we have added to create the dictionary are:
- Max: The maximum unit of measurement. This field will be ingested by enrichment of a metadata created.

- Min: The minimum unit of measurement. This field will be ingested by enrichment of a metadata created.

- Momentum: The date on which the data is stored. This field will be ingested in the ingestion itself.

- State: This variable indicates the status of the value. This field will be ingested in the ingestion itself.

- Unit: Indicates the unit of measurement in which the values are expressed. This field will be ingested by enrichment of a metadata created.

- Tag: It is the ID of the ingestion, thanks to this value we will be able to link the ingestion with the metadata. This value will be found in both ingestions.

- Value: It is the value that represents each variable at that particular time. This field will be ingested in the ingestion itself.

# Contextualising your data pipelines
In this tutorial we are going to explain by means of an example how we can contextualize the data of an ingestion in Knolar.
Before proceeding to create an ingestion it is important to take into account that one of the mandatory sections of the ingestions is related to contextualization. Therefore, we must previously create the different types of contextualization that we are going to find in the ingestion.
When creating an ingestion you can omit the contextualization part. However, if you want to take it into account, you must carry out this process before starting the ingestion.
# Steps to Contextualising your data pipelines
La finalidad principal de la contextualización es crear un prefijo. Para poder llegar a ello, es necesario rellenar previamente el apartado de sites y sources ya que el prefijo es la unión de ambos. Por lo tanto, los pasos a realizar son:
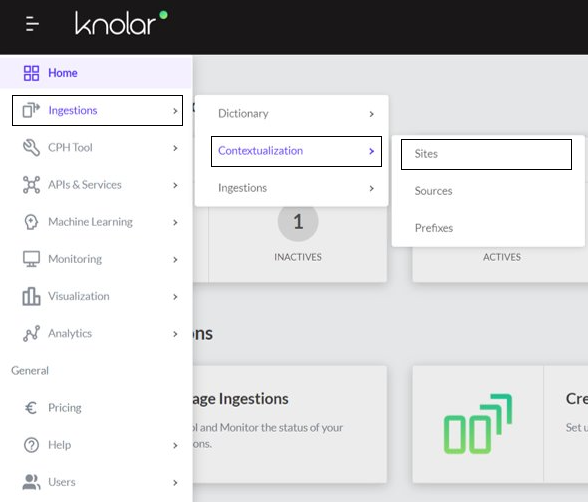
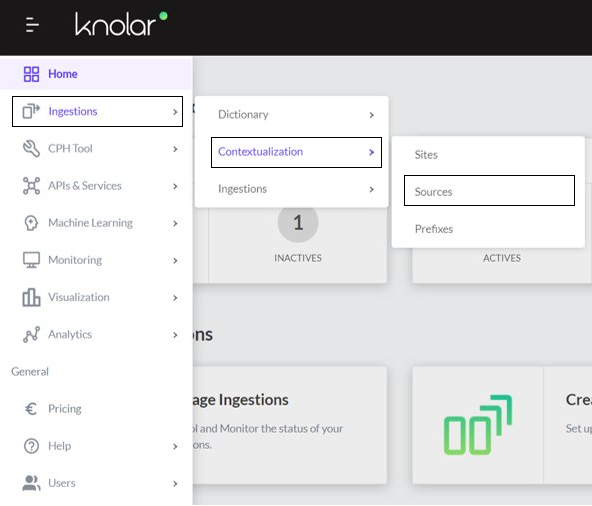
- First, we will create a site. To access this section you must select in the menu ingestions -> Contextualization -> Sites
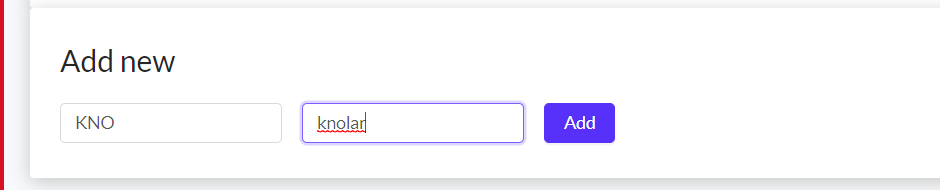
- In our case we have added this site

- Secondly, we will create a sources. To access this section you must select in the menu ingestions -> Contextualization -> Sources
- this is an example of how we have filled in this tab
- Finally, we will create a prefix. To access this section you must select in the menu ingestions -> Contextualization -> Pefixes
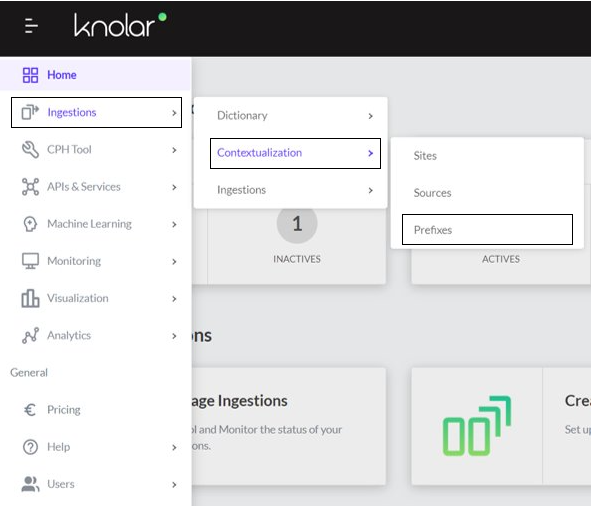
- To finish with the contextualization part we fill in the prefixes section

# How to generate a Metadata Ingestion
In this tutorial, we will explain step by step how to create a metadata ingestion, in other words, a static ingestion.
The main purpose of this type of ingestion is to enrich the ingestions in real time and batch. For this purpose, it is important that one of the variables composing the metadata ingestion coincides with the ingestion on which we want to enrich.
In addition, we must take into account that in case we want to enrich the ingestions in real time or batch, we must carry out this process before.
For its creation, it will be necessary to have a CSV with an example of the data to be ingested.
# steps to generate a Metadata Ingestion
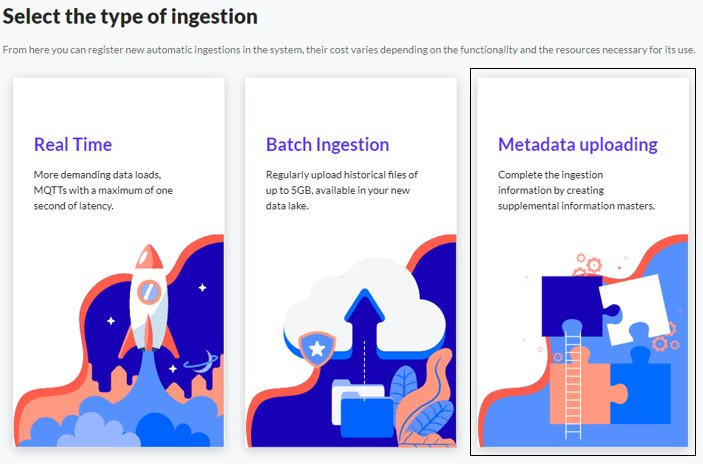
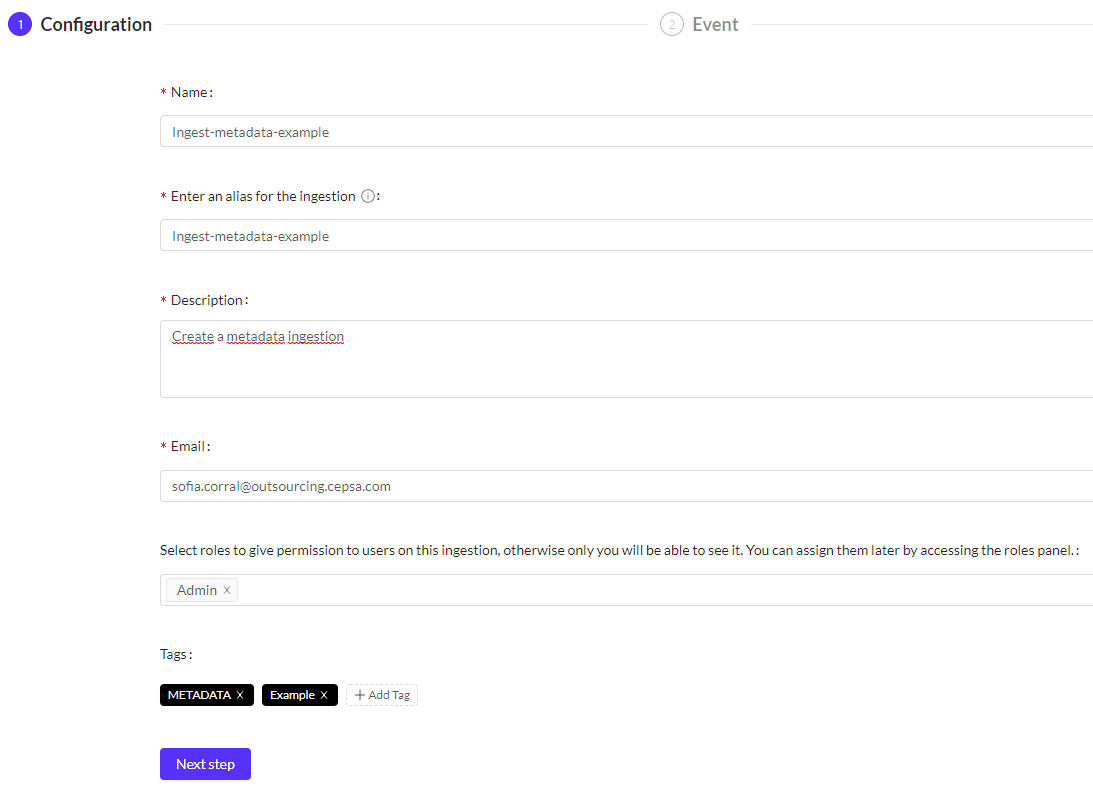
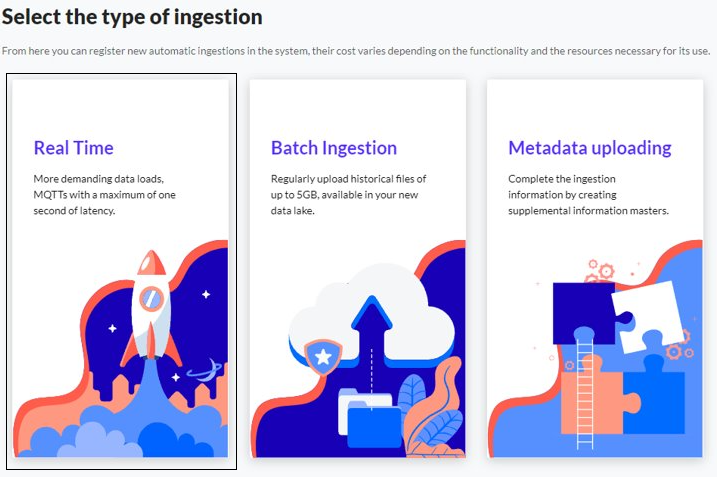
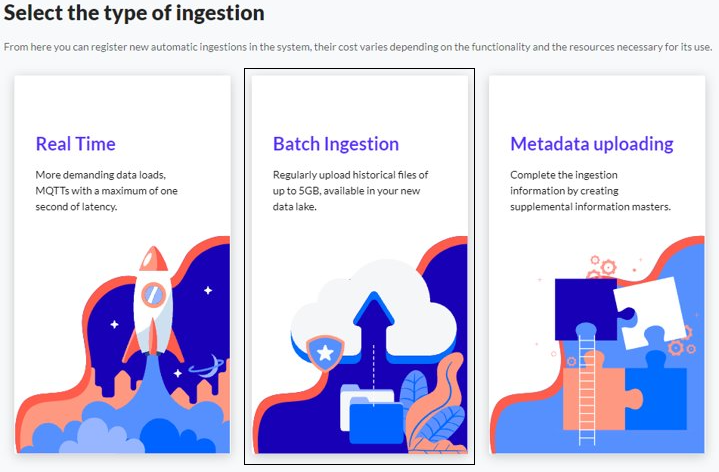
- To access this section you must select in the menu ingestions -> Ingestions -> Create Data Ingestion

- Then, you must select the type of ingestion you want to create (Metadata)
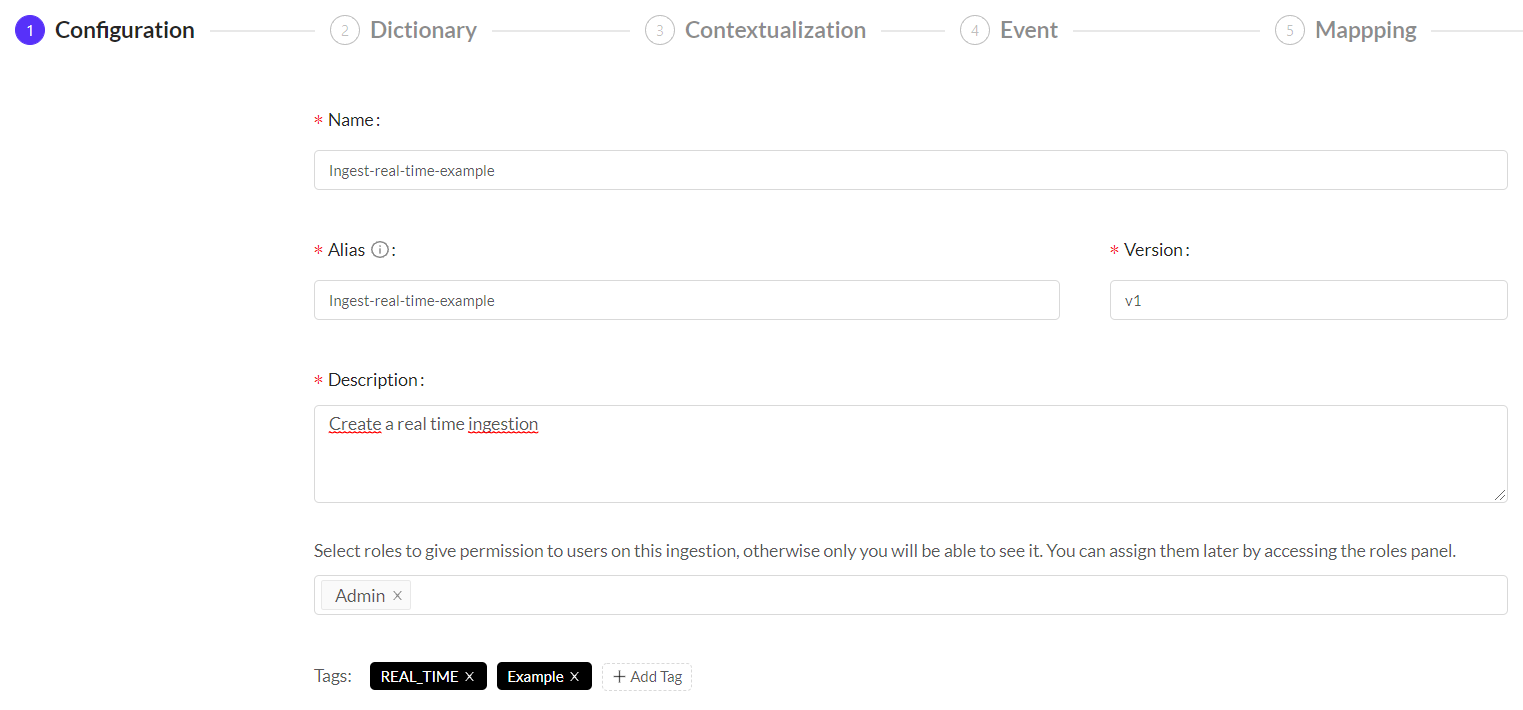
- You must enter the different fields requested. In our case, apart from the mandatory ones. We have added a new role (admin) and a new tag (Example). The meaning of each one of the variables can be found explained here (opens new window)
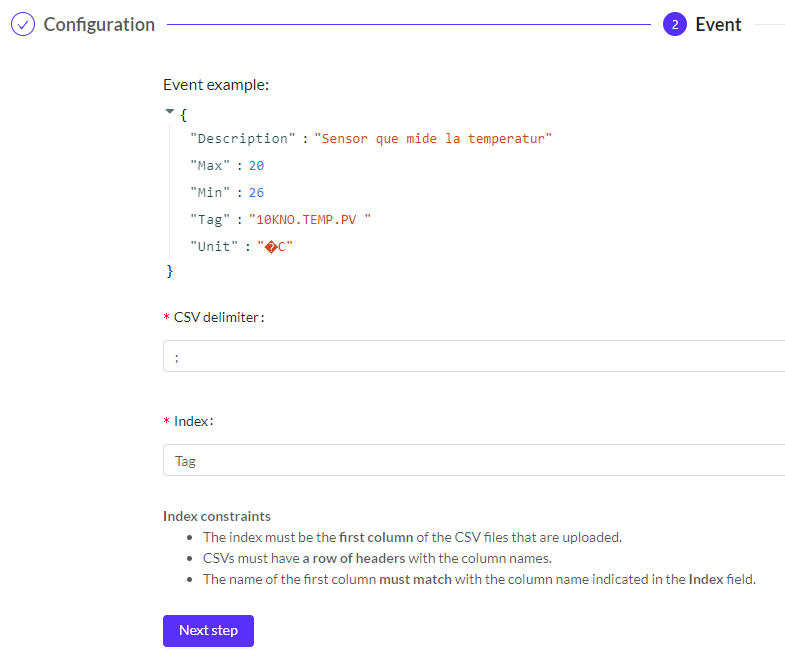
- Then, you must add a sample file in CSV format, indicate the file separator and the column to index metadata searches during enrichments. In this section it is important to take into account the above mentioned, the index is the variable that is going to join both ingestions. So it must have the same name in all of them. In our case, the variable in common is called 'tag' and, we will find it in the ingestion in real time or batch with the same name.
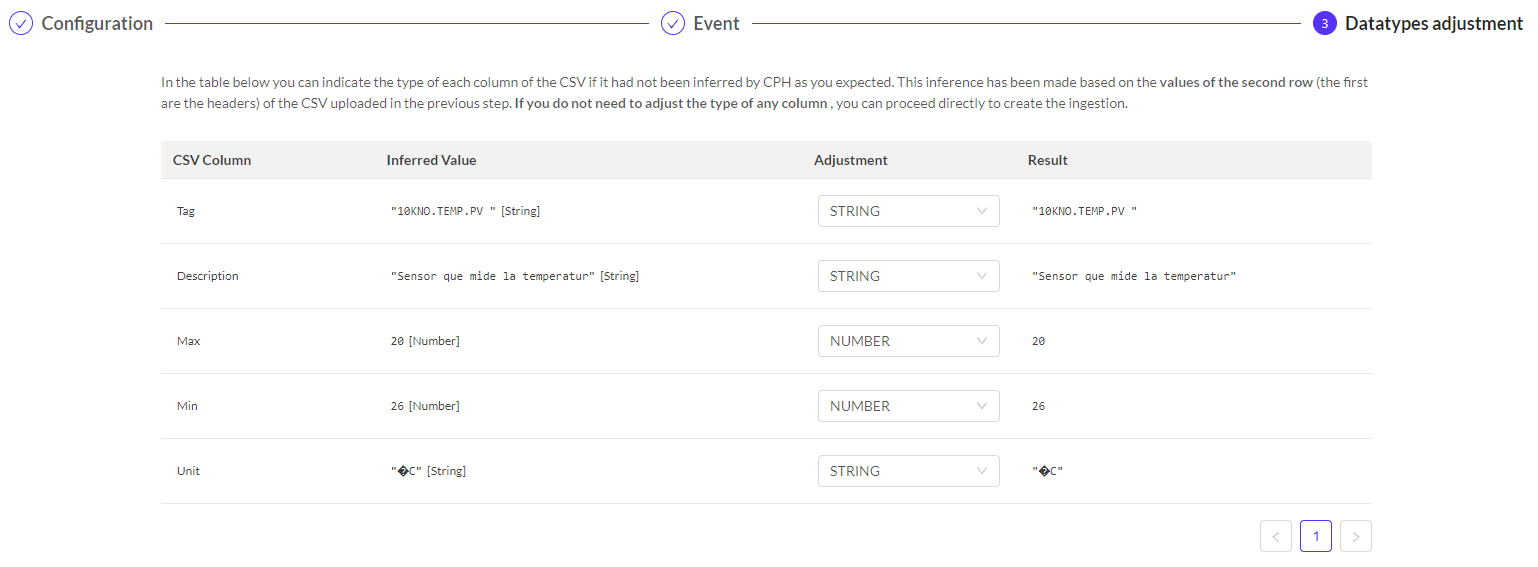
- Finally, we must confirm that the type of value is correct. If it is not, it must be adjusted for the ingestion to be correct. Nevertheless, it is advisable to adjust it even if the value is correctly. In our case, we have adjusted all the values again.
- Once the ingestion is created we must take into account that we have simply created a base to ingest data later, that is to say, we have created a kind of structure and now we must ingest the data. To do this we must click on 'view details' and download both the certificate and the keys and then run in a terminal the command lines that knolar itself provides us when creating the ingestion and click on 'view details'. The only change that we must make is to modify the name of the .csv that we are going to add. It is important to know that it is an ingestion in metadata and that the data that is put in the ingestion comes from a static table.
# Publishing real time data to Knolar
The following tutorial will explain in detail all the steps to be taken in order to create an ingestion in real time.
Before creating a real-time ingestion we must know that its main feature is the constant data loading.
In addition, it is important to take into account that, before starting with the ingestion we must have created the dictionary (in case it is not created you can find the necessary information for its creation Here (opens new window)). In case we want to contextualize the ingestion, it will be necessary to have previously created different site, sources and prefix (to see how to create them, you can access Here (opens new window)) and, if we want to enrich the data, it will have been necessary to create a metadata ingestion (to find this information, access Here (opens new window)).
Finally, it will be necessary to attach a sample file throughout the process. It is advisable to have it ready before starting the ingestion.
# Steps to publishing real time data to Knolar
- To access this section you must select in the menu ingestions -> Ingestions -> Create Data Ingestion
- Then, you must select the type of ingestion you want to create (Real Time)
- You must enter the different fields requested. In our case, apart from the mandatory ones. We have added a new role (admin) and a new tag (Example). The meaning of each one of the variables can be found explained here (opens new window)
Now we must select the dictionary that fits our data, that is to say, that consists of the same variables and format as the example file that we are going to attach later. This dictionary must have been previously created (in case it has not been created, you can click here (opens new window) and follow the instructions to create it). To select the dictionary, we simply have to look for it by its name, it is advisable to check by clicking on 'see details' if it is the correct dictionary and there is not any error. Once the ingestion is created, modifications can be made, but it is not allowed to change the selected dictionary. Remember that the dictionaries must include the real-time ingestion variables and the variables to be used for data enrichment.
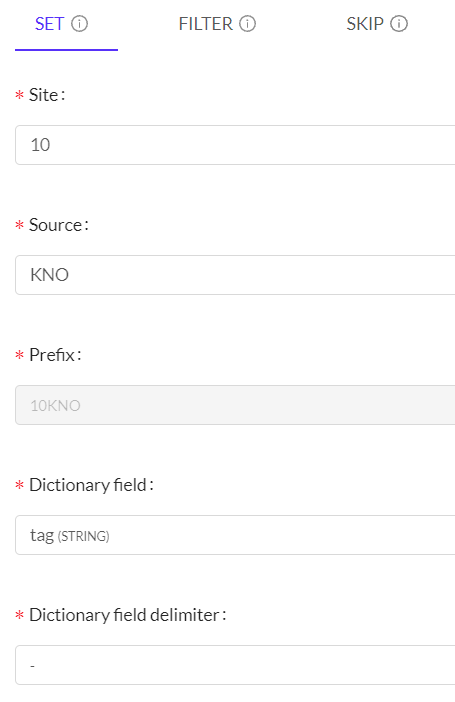
The next step is contextualization. In this section we must select one of the three types that we want to apply (set, filter, skip). If you want to know the purpose of each section you can click here (opens new window). In this example, we have used 'set' and we have filled in the different fields requested according to our ingestion
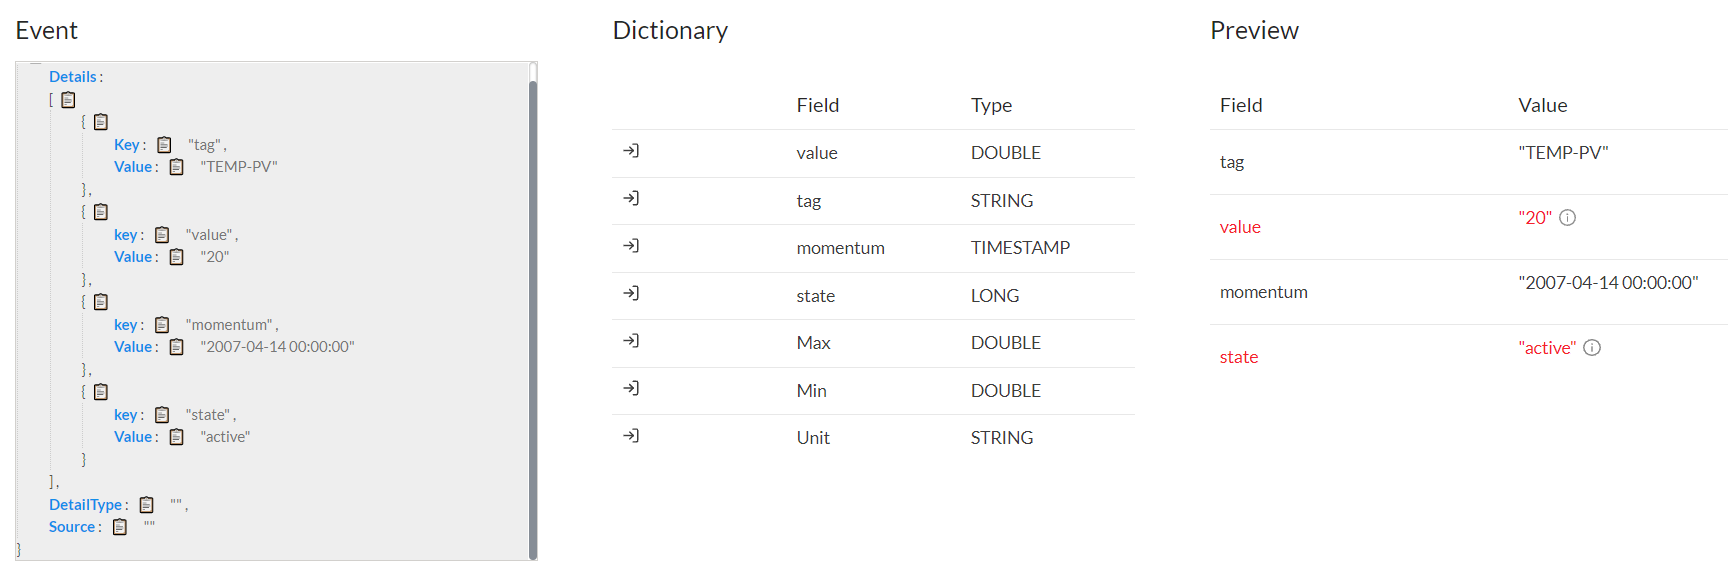
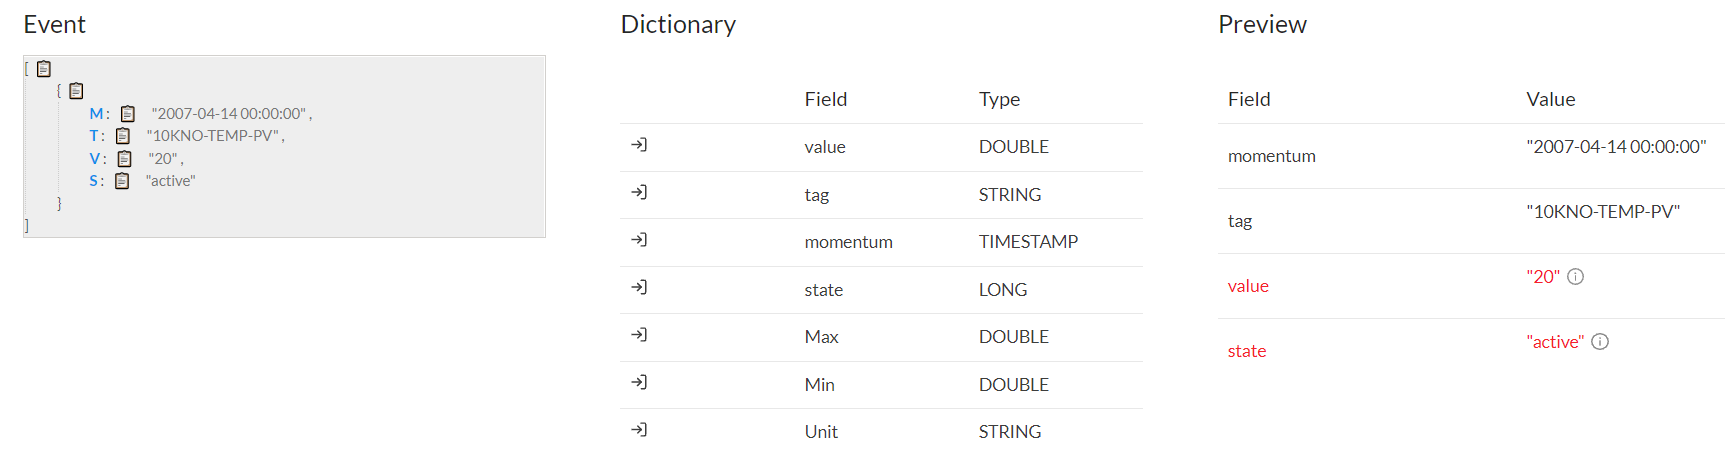
- The next section, it is the event. In it we must indicate the number of publications per second that will occur in the ingestion and add an example JSON. The example JSON that we have added is the following:
{
"Details": [
{
"Key": "tag",
"Value": "TEMP-PV"
},
{
"key": "value",
"Value": "20"
},
{
"key": "momentum",
"Value": "2007-04-14 00:00:00"
},
{
"key": "state",
"Value": "active"
}
],
"DetailType": "",
"Source": ""
}
- To map the fields, we only have to select one by one the variables of the example JSON and join them with their name in the example dictionary. It is normal that in the preview, red fields appear. This is not due to an error but that Knolar collects all the fields as Strings, in case it is not like that, it will appear as an error and it will have to be modified later in the section of transformations.
- The last section is related to enrichment and transformation. If you want to enrich the ingestion data, Click Here (opens new window) and you will see the steps in detail. In case you want to perform a transformation, click Here (opens new window) and you will see the steps in detail.
- Once you have filled in all the fields, you must activate the ingestion and you will have created the environment. It is important to note that once you have completed these steps, you must indicate the data to be ingested.
Step 1
After creating the real time ingest, go to ingestión management there you will your ingest.
Select your ingest and click on details, There you willl see a json and three options to donwload.
Download the Private key, Public key and certificate. After you have downloaded it go to the following repository where the code is located.
Step 2
Download the code and start
In this step, after we have the code we can start modifying it.
First you need to change the endpoint and topic this is found in the json mentioned in step1.
"endpoint":"a2f8qpo41xhi6t-ats.iot.eu-west-1.amazonaws.com"
"topic":"332b48888762arupeb"
- Then go to the code and paste it inside the parenthesis. Separating it with quotation marks from the topic as in the example
topic = os.getenv('TOPIC','332b48888762arupeb')
ENDPOINT = os.getenv('ENDPOINT','a2f8qpo41xhi6t-ats.iot.eu-west-1.amazonaws.com')
- import the certificate and the private key into the folder/directrio
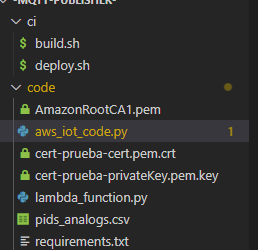
5.After importing that . Put the name of the Private key certificate and the certificate is located in line 27 of the code
27 myMQTTClient.configureCredentials("AmazonRootCA1.pem","cert-%s-privateKey.pem.key" % ALIAS, "cert-%s-cert.pem.crt" % ALIAS)
To ingest data in real-time we must execute the code that you will find in the following repository (opens new window). To edit the code in order to ingest data in another ingestion, we must take into account and download the certificate, the public and private key of the ingestion in which we want to add the data. These must be added in the same way as we found the example files. In addition, in the code it will be necessary to change the name of these files and the 'endpoint' and 'topic' that appear in the first lines of the code 'aws_iot_code.py'. After making the following changes and executing the code you will be able to see the ingested data in the terminal. In this example file we only start from a 'tag' and fill the rest of the data with random values.
# Ingest, Enrich and Transform your real time data
In this tutorial we will explain in detail how to ingest data (enter values), enrich ingestions when creating them and transform the data we are going to enter into the ingestion.
# Ingest
It is important to note that when we create an ingestion we are only creating the environment. After creating the ingestion, it is necessary to enter the values. Next, we will see how to do it.
There are different ways of ingestion of data. One of them can be found by using the APIs provided by Knolar. The steps to follow are as follows:
- Access the 'Developers Portal', section that you will find in the menu, under 'APIs & Services'. Register by clicking on the 'Sign In' section at the top right of the screen. Once you are registered, access the 'APIs' section at the top left of the screen. Inside you will find two different subsections (If you want to know in detail the different options that each of the sections have, click here (opens new window).
- In our case we are going to use a method that appears inside 'CPH Developers Ingestion API'. To do this, we must subscribe within that section.
- Once we are subscribed, we must access the method we want to use, in our case it will be: POST /ingests/{ingest}/data. If you want to know more information about the method, you can access Here (opens new window).
# Enrich
The purpose of this section is to create more value to our data and to have more information in our ingestion. In order to enrich an ingestion it is necessary to have created a metadata ingestion and to have added values to it. For more information about this previous section click here. To be able to enrich the ingestion, it is necessary that the dictionary with which we are going to create the ingestion contains the variables with which we are going to enrich the ingestion.
The steps to perform are:
- Access to create a new ingestion, select the type of ingestion (real time or batch).
- Fill in all the necessary sections. If you need help to create a real-time ingestion, access Here (opens new window). In case you need help to create a batch ingestion, access Here (opens new window) (To fill in the enrichment section of both ingestions, read the steps below).
- To enrich the ingestion, you must fill in the fields that appear in that section, i.e. indicate the metadata ingestion you want to use and the tag. You will automatically see a preview of the final result.
# Transform
This section is one of the most important when creating an ingestion. Knolar, when creating the ingestion, asks the user for an example file with the name of the variables and some data. When loading this file in the ingestion, all the values will be converted into 'Strings'. Therefore, one of the transformations that we will have to perform will be destined to indicate the correct format of our data. In case you want to make any transformation, it must be done in the ingestion itself, these changes can be made both in real time ingestion and batch.
The steps to perform are:
- Access to create a new ingestion, select the type of ingestion (real time or batch).
- Fill in all the necessary sections. If you need help to create a real time ingestion, click Here (opens new window). In case you need help to create a batch ingestion, access Here (opens new window) (To fill in the section of transformations of both ingestions, continue reading the steps).
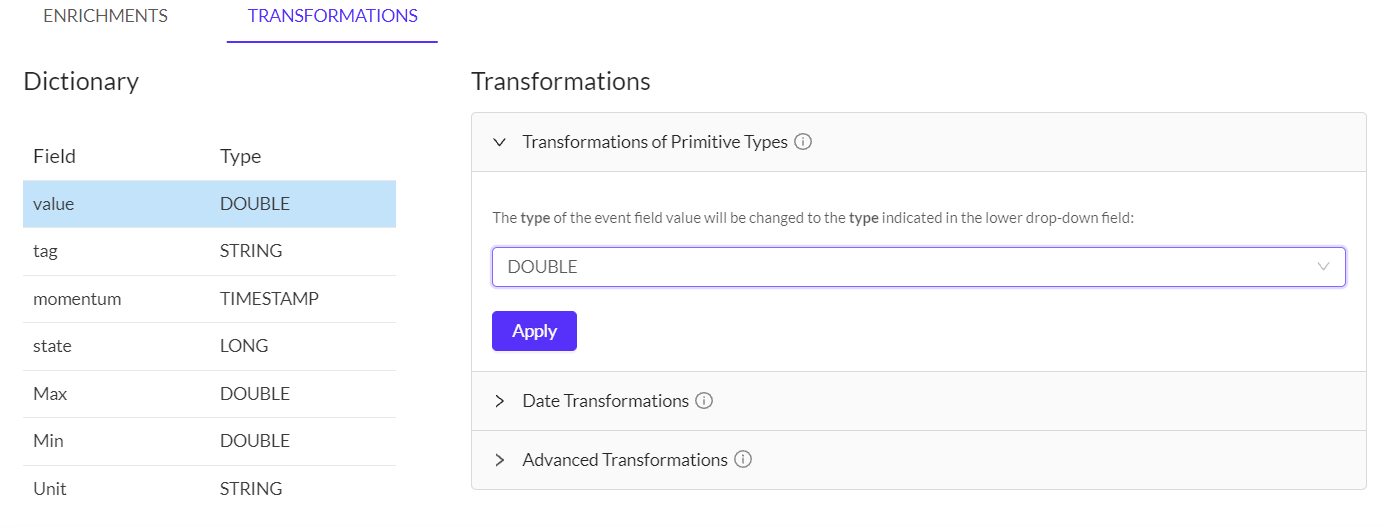
- In the transformations section, you will see the three different types of transformations that Knolar performs. To perform any transformation you must select the variable you want to modify from the section on the left (Dictionary). Then, you must indicate the type of modification you want to make and fill in the necessary fields in each section (Transformation). For example, in this image we have indicated that the variable 'value' is of type Double
# Combined Ingestion
In this tutorial we will explain in detail how to combine ingestion and what is the main purpose we want to achieve.
The main purpose of combining ingestions is based on the union of two ingestions of different types, that is, combining a batch ingestion with a real time ingestion. Its use is reflected in the fact that, if we want to migrate a database in which the data are being ingested in real time, the first step to be taken is to create this ingestion and load the data that are being generated. In addition, we must add the historical data that we already have stored (the most appropriate for this section is to do it through a batch ingestion) and this is where we must make use of the combined ingestions.
The most common way to combine ingestions is to use one in real time and another in batch. However, we should know that it is possible to make any kind of combination between two ingestions (real time or batch). In addition, it is important to keep in mind that the dictionary that we are going to use in both will be the same.
# Steps to Combined Ingestions
- Create a real time ingestion with the data we are taking. In order to perform this process, it is recommended to access here (opens new window). In case you have any problem with the variables to fill in, you can access here (opens new window).
- Connect the data with the ingestion created to store them. To perform this process, you must access here (opens new window).
- Once the ingestion is created, you must access it from the Ingestions Management section and click on create additional data source and indicate the type of ingestion we want to combine. In this case, batch ingestion.
- Fill in those fields that are necessary and have not been filled in automatically. If you want to know more information about how to generate a batch ingestion, you can access here (opens new window) and, if you have any doubt about a specific field, you can access here (opens new window).
- Add the data we have in our history to the ingestion.
# Batch ingestion
The following tutorial will explain in a detailed way all the steps to be performed in order to create a batch ingestion.
Before creating a batch ingestion, we must know that its main characteristic is that the load is not constant. In the case of Knolar, this data will be updated every hour.
In addition, it is important to take into account that, before starting with the ingestion we must have created the dictionary (in case it is not created you can find the necessary information for its creation Here (opens new window)). In case we want to contextualize the ingestion, it will be necessary to have previously created different site, sources and prefix (to see how to create them, you can access Here (opens new window)) and, if we want to enrich the data, it will have been necessary to create a metadata ingestion (to find this information, access Here (opens new window)).
Finally, it will be necessary to attach a sample file throughout the process. It is advisable to have it ready before starting the ingestion.
# Steps to create a batch ingestion
- To access this section you must select in the menu ingestions -> Ingestions -> Create Data Ingestion
- Then, you must select the type of ingestion you want to create (Batch)
- You must enter the different fields requested. In our case, apart from the mandatory ones. We have added a new role (admin) and a new tag (Example). The meaning of each one of the variables can be found explained here (opens new window)

Now we must select the dictionary that fits our data, that is to say, that consists of the same variables and format as the example file that we are going to attach later. This dictionary must have been previously created (in case it has not been created, you can click here (opens new window) and follow the instructions to create it). To select the dictionary, we simply have to look for it by its name, it is advisable to check by clicking on 'see details' if it is the correct dictionary and there is not any error. Once the ingestion is created, modifications can be made, but it is not allowed to change the selected dictionary. Remember that the dictionaries must include the batch ingestion variables and the variables to be used for data enrichment.
The next step is contextualization. In this section we must select one of the three types that we want to apply (set, filter, skip). If you want to know the purpose of each section you can click here (opens new window). In this example, we have used 'set' and we have filled in the different fields requested according to our ingestion
- The next section is the event. In it we must attach an example file in CSV format and indicate the delimiter of this file. We must take into account that the example file must be similar to the data to follow, that is to say, the delimiter must match.
- To map the fields, we only have to select one by one the variables of the example JSON and join them with their name in the example dictionary. It is normal that in the preview, red fields appear. This is not due to an error but that Knolar collects all the fields as Strings, in case it is not like that, it will appear as an error and it will have to be modified later in the section of transformations.
- The last section is related to enrichment and transformation. If you want to enrich the ingestion data, Click Here (opens new window) and you will see the steps in detail. In case you want to perform a transformation, click Here (opens new window) and you will see the steps in detail.
- Once you have filled in all the fields, you must activate the ingestion and you will have created the environment. It is important to note that once you have completed these steps, you must indicate the data to be ingested.
# Explore your data with Superset
The following tutorial will explain in detail all the steps to be performed to explore the data that are part of the ingestion using Superset.
To access the superset it will be necessary to enter your account data and password. In addition, you will need to have knowledge of SQL.
Once inside, there are a lot of sections that help to see in detail the data being ingested. In this tutorial we will explain how to do this using SQL-Lab. If you wish to access the documentation on this section click here (opens new window).
# Steps to explore your data with Superset
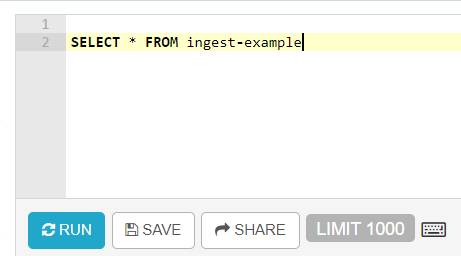
- Once you have accessed the superset, select SQL Lab --> SQL Editor at the top and you will be in the right place to start exploring the data using SQL queries.

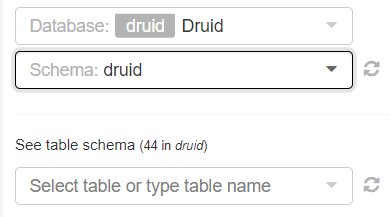
- On the left side of the screen, there are different sections to fill in before making the SQL query, we will indicate 'Druid' both in the database and in the schema and the name of our ingestion in the section to select the table.
- The next step would be to write the SQL query that you want to execute and click on execute. The result of the query will appear at the bottom.
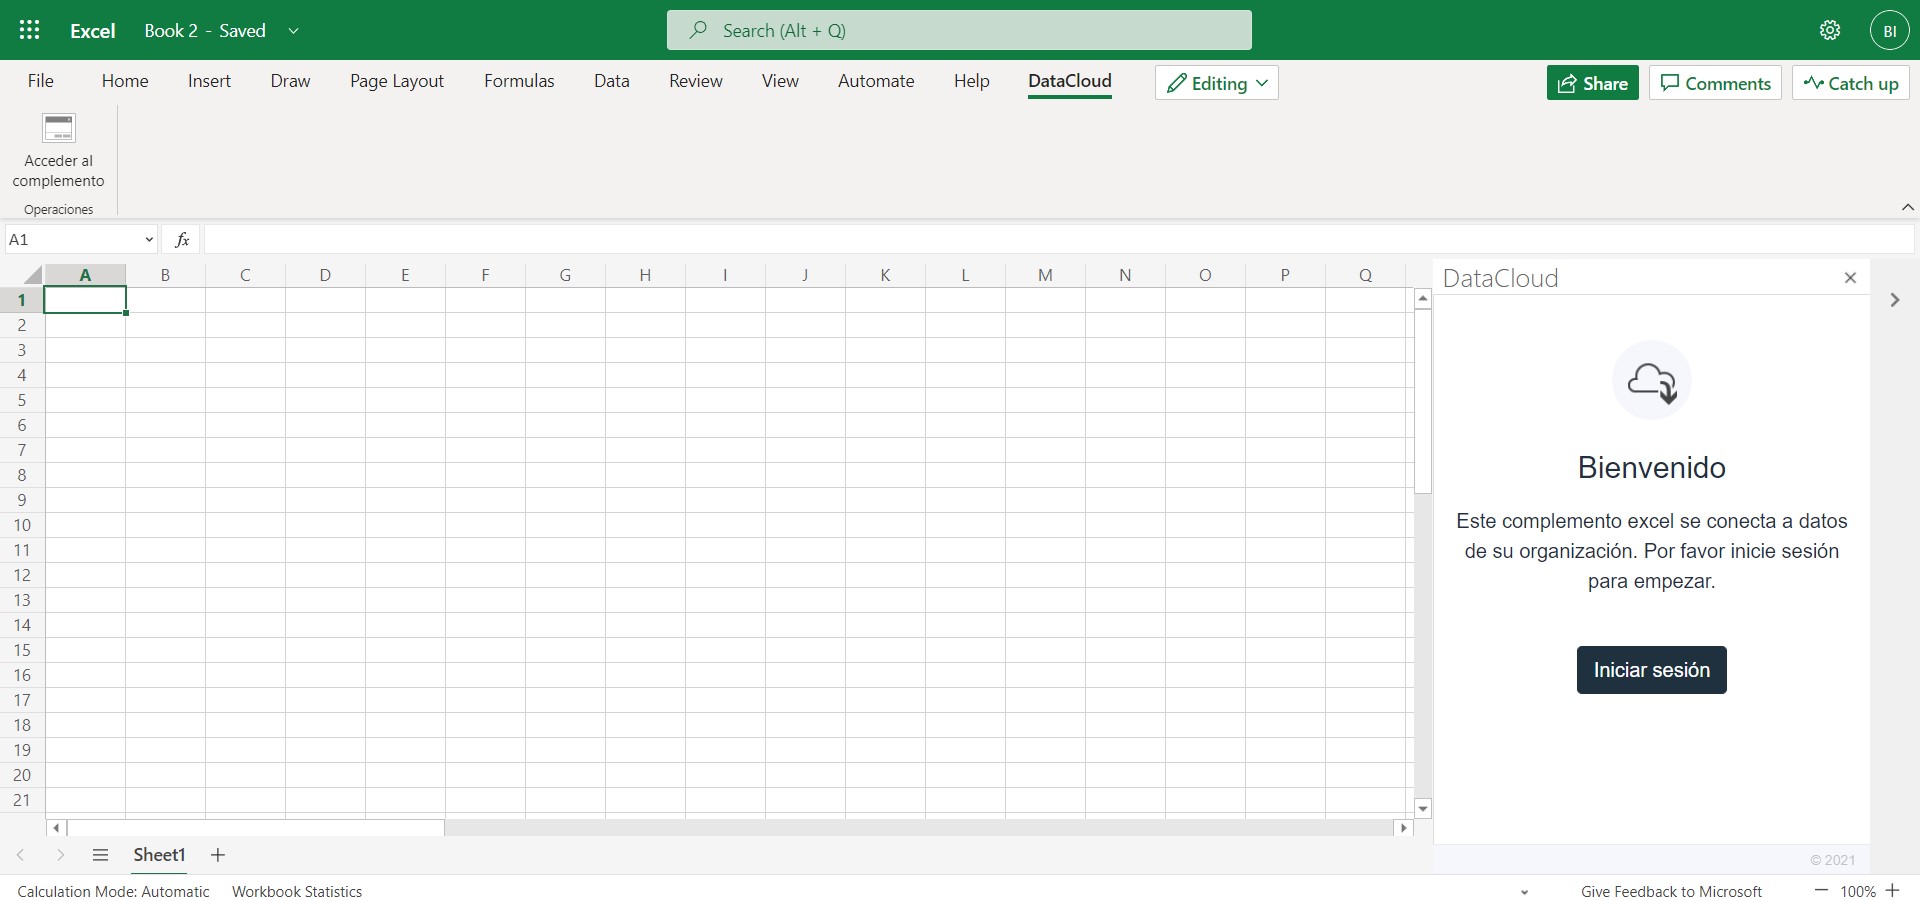
# Using Knolar Excel Add-In
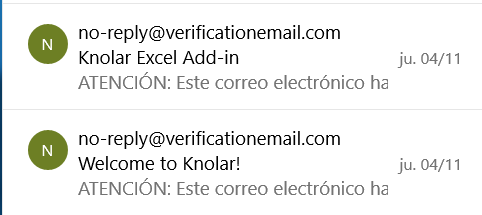
connect knolar with excel once you are registered in knolar you must receive two mails one with your knolar password and another one containing the excel password to connect it to knolar.
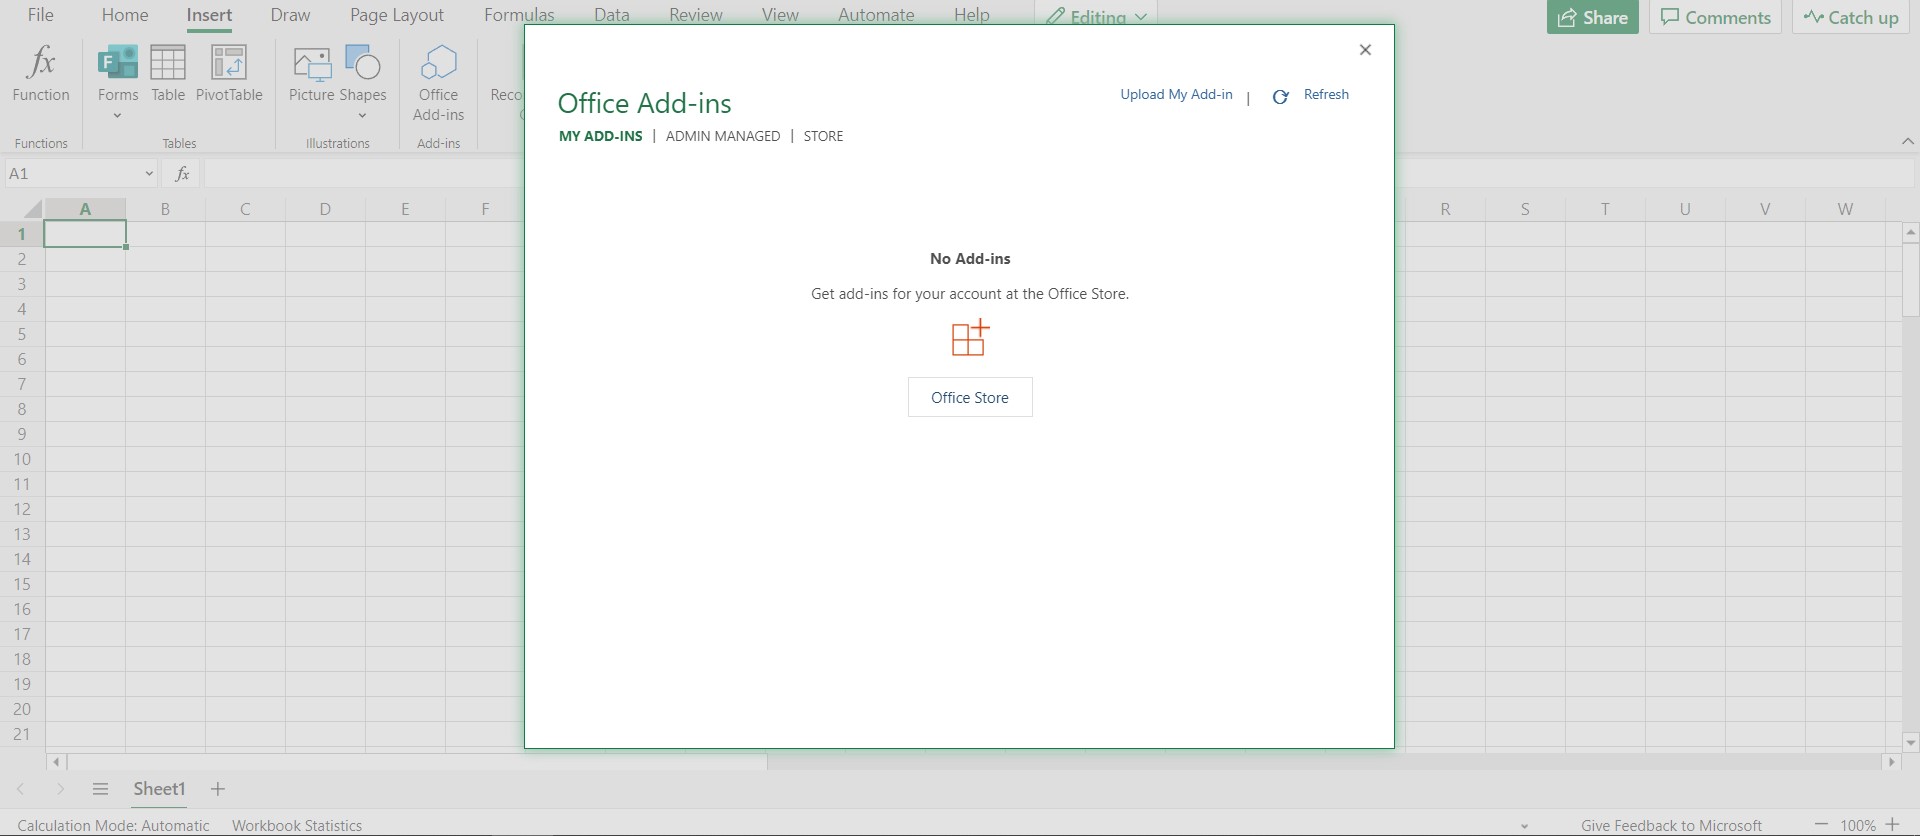
- Then go to knolar page, to the analytics part and click in excel add-in. Download the indicated link the xml file.
After doing that open excel then go to insert (My Add-ins) upload the xml file downloaded above.
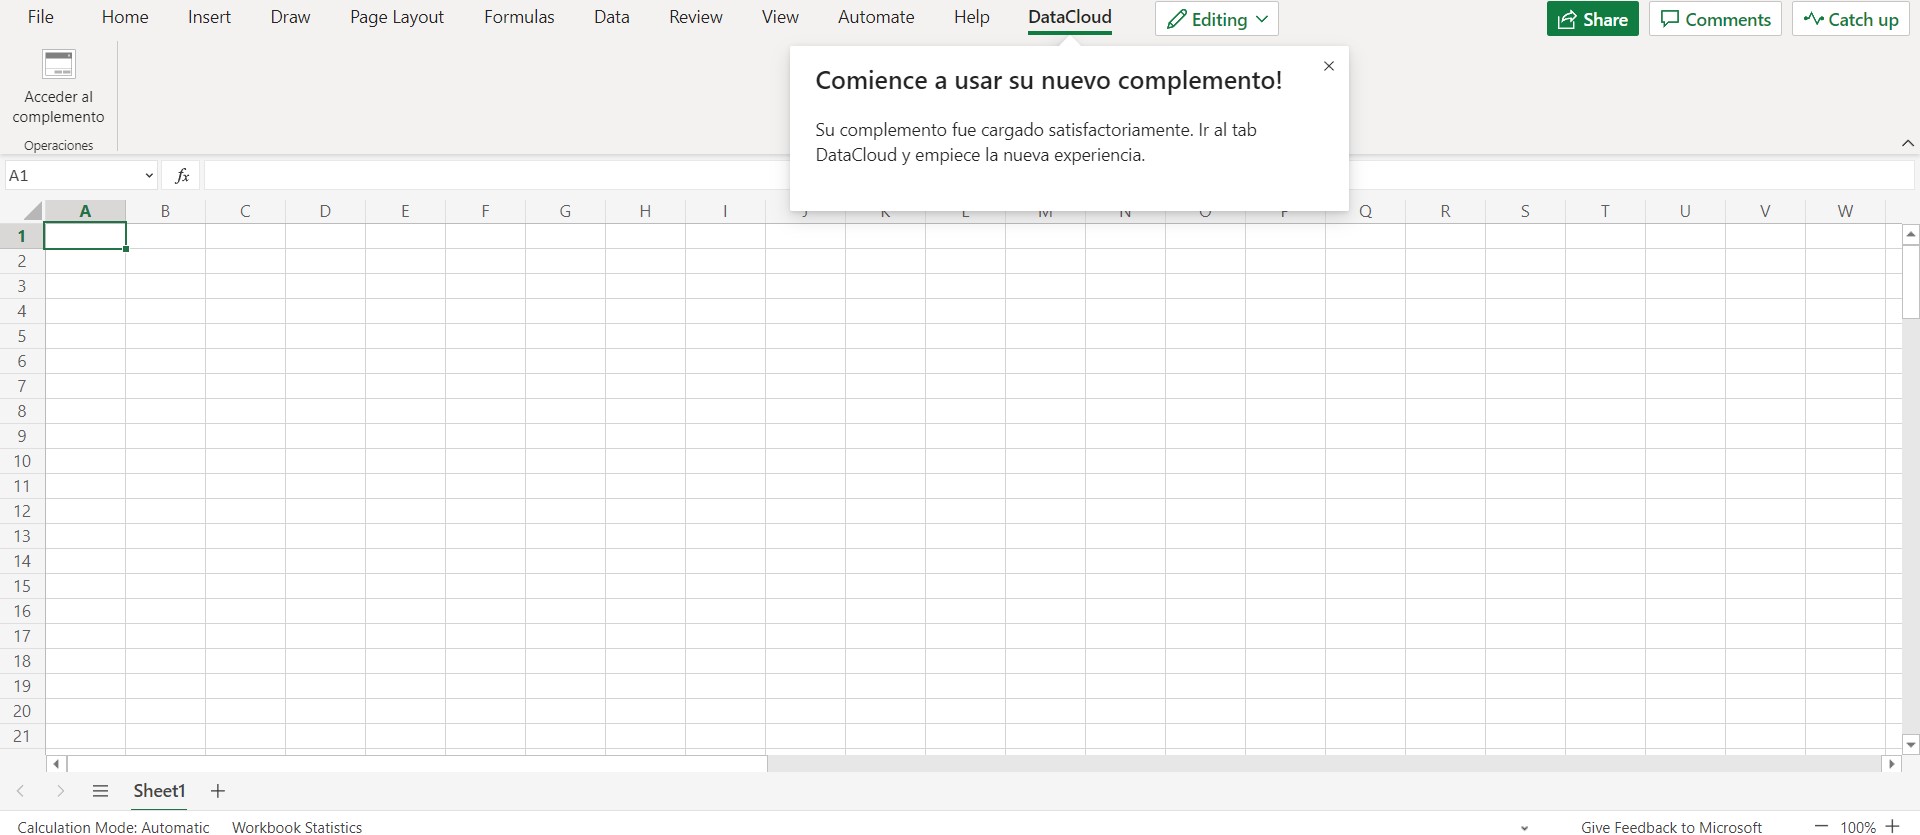
- A new window appears after uploading the file, click on the add access and login with the password you were given in the Excel email when you enter the password you will be prompted to change it
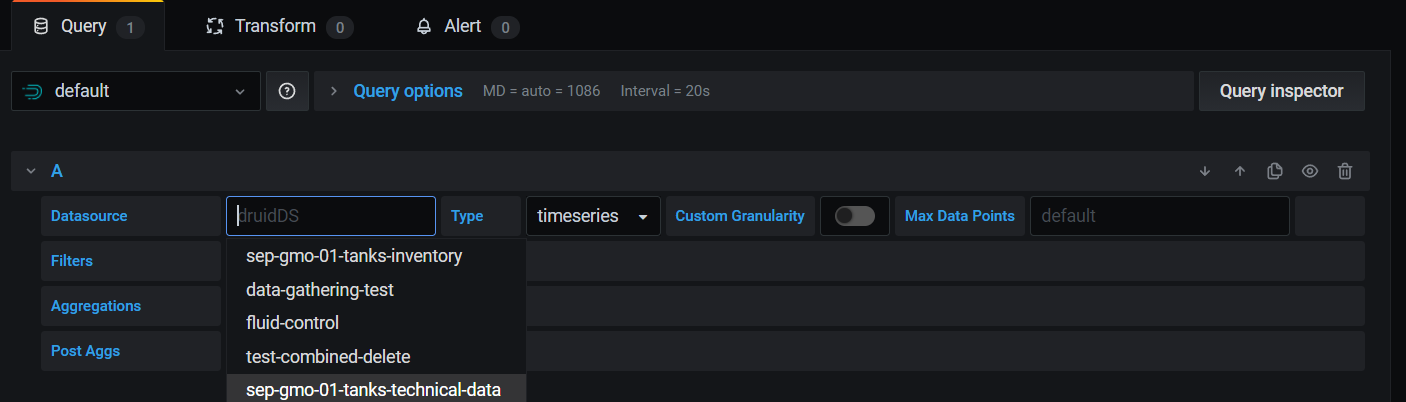
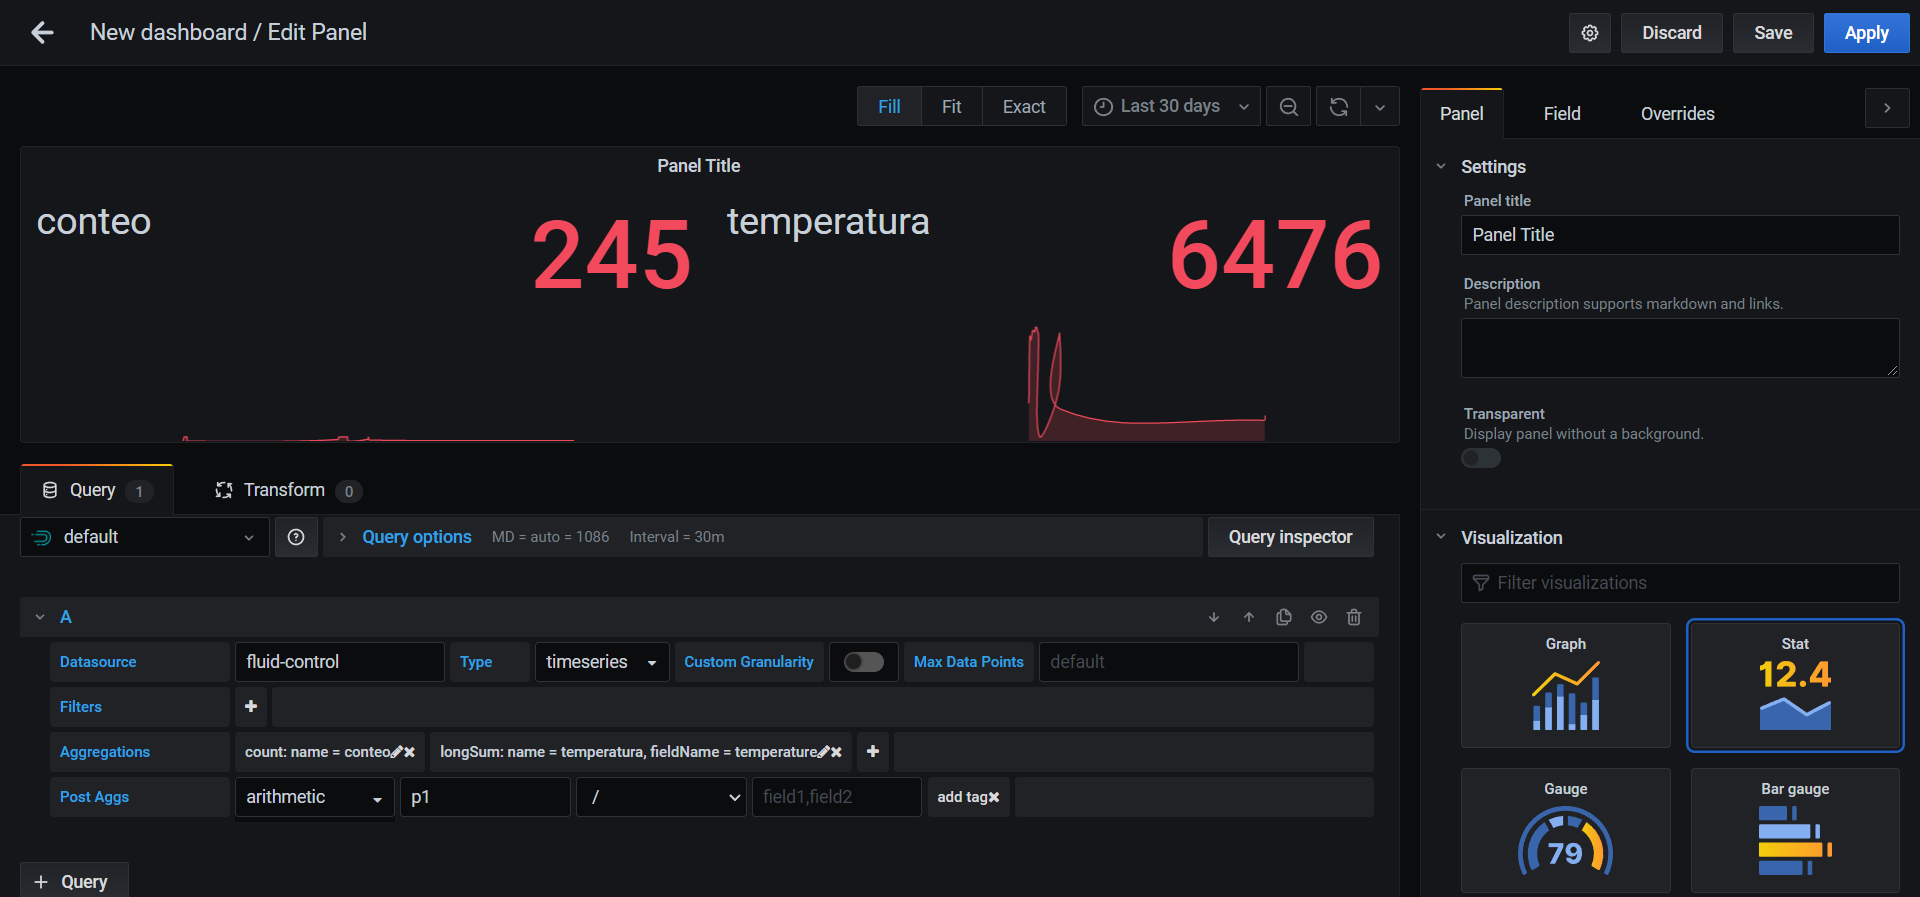
# Your First Grafana Dashboard
To create your first dashboard go to de + icon on the menu then click on dashboard and add new panel. Once into the dashboard panel go to the Query tab and select druid. Then in data source look for your ingest and select it.
Secondly fill the aggregation fields. You can search everything that has the previously ingest selected (temperature, mass… etc).

The Post Aggs
# Jupyter notebooks in Knolar
In this tutorial, we are going to explain how to create a notebook in jupyter using the Knolar shortcut.
# Steps to create a Jupyter notebook
- Once you are logged in and inside jupyter, go to the 'New' section at the top right and create a new notebook (python 3).
IMPORTANT: You must take into account the indications that appear in the documentation regarding the creation of notebooks. You can review them by clicking Here (opens new window)
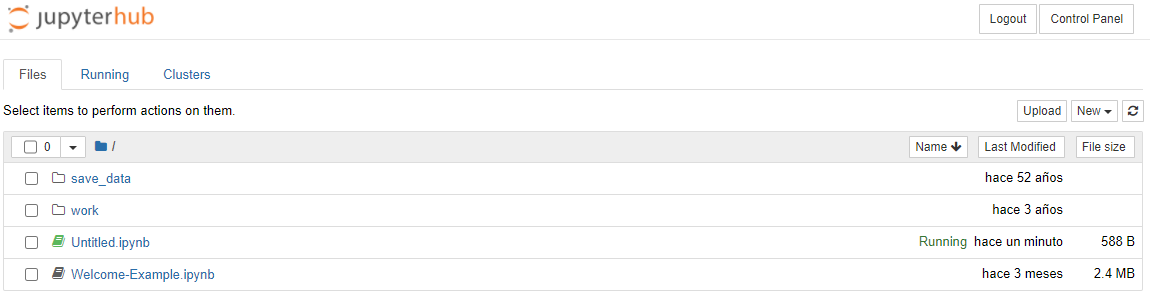
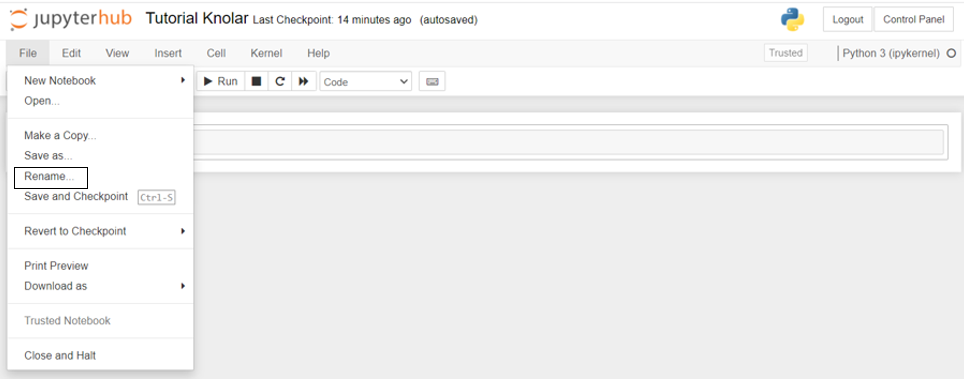
- The notebook created automatically will have the name 'Untitled', this name must be modified. To do this you can access the notebook and click on the name or, inside the notebook, go to File -> rename.

The notebook is now ready to work. Next, we are going to make some important indications to take into account:
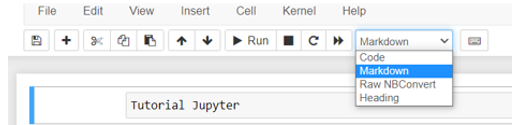
- If you want to execute text, you must modify in the upper part 'code', by ' Markdown'.
- If you want to execute code, the cell will automatically be created for it.
- You must take into account that, before executing any command, you must make the necessary import.
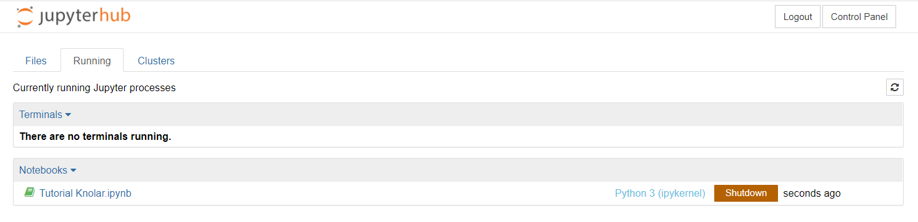
- Before exiting the console, check that there is no notebook running. To do this, you must access the running section. In case any notebook appears, you must press on 'shutdown' until no notebook is running.